
 Maybe you've heard of this stunningly beautiful bread before? It came as a total unknown to me, so I am very grateful to have been presented with this baking challenge!
Sara and Erica of Baking JDs were our March 2012 Daring Baker hostesses! Sara & Erica challenged us to make Dutch Crunch bread, a delicious sandwich bread with a unique, crunchy topping. Sara and Erica also challenged us to create a one of a kind sandwich with our bread!
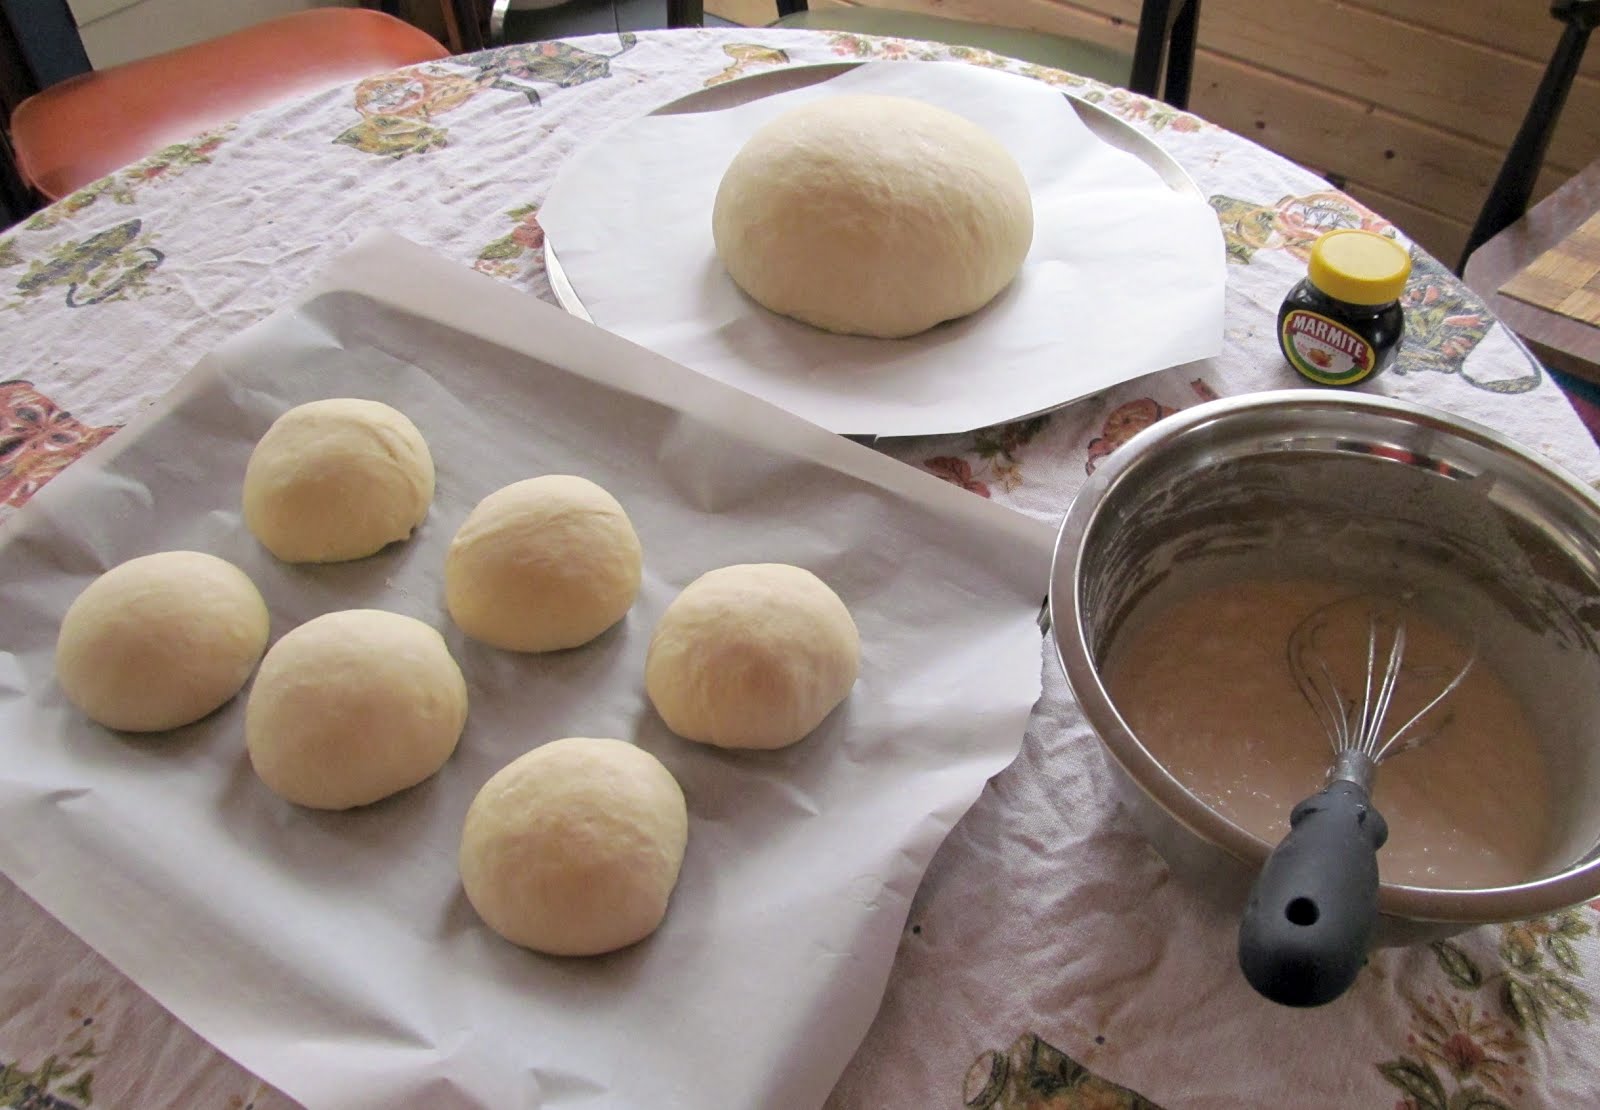 Since I'm fairly new to baking, I don't really have a "go to" recipe for white bread, which is what you'll need to make this crunch bread. Dutch Crunch is a basic yeast bread that is glazed with a rice flour mixture before baking. For this challenge, I made the rolls and the round loaf that you see above...
 Then I glazed them with my rice flour "frosting" to which I had added toasted sesame oil and Marmite (for flavor and color)...
 And 30 minutes later, this is what came out of my oven! Isn't it a beauty? The recipe is simple, and the bread is perfect! I know that I will use this recipe for years to come.
 For the sandwich portion of the challenge, I made these sausage pepper burgers, which are basically a breakfast sandwich that we enjoy for dinner at times. You don't really need a recipe- just be sure to use good fresh ground country sausage and flatten your patties very thin. In a cast iron skillet over medium/high, you will need no oil and you don't need to mix anything into the ground meat to bind it. Saute your sliced peppers in a little oil (I use the same skillet after the sausage is done and the meat is resting), remove the peppers from the pan when they are still a bit crunchy, and serve the sandwich with a few slices of very sharp cheddar. I like to use a little mayo with a lot of pepper, but you can serve them to taste. Yum! This sandwich is rich and delicious- if you want to go over the top add a fried egg. Eat it for breakfast and you won't be hungry again until dinner!
 And of course, I had to whip up some blats (bacon, lettuce, avocado and tomato)! This bread is perfect for sandwiches. See the recipe below for how to make your own Dutch Crunch. For a very easy and delicious white bread, forgo the rice flour glaze and just bake up the plain dough.
Dutch Crunch Bread makes 2 large round loaves or 12 sandwich rolls
The recipe for the Dutch Crunch topping came from Rose Levy Beranbaum’s The Bread Bible. The recipe for the bread below came from The Bread Bible and an adaptation of a recipe found on bakingbites.com.
The recipe below is based on my experience. You can find the original pdf version here.
2 tablespoons active dry yeast
1/2 cup warm water
1 cup warm milk
3 tablespoons sugar
4 tablespoons oil (plus additional oil for greasing bowl during rising)
1 tablespoon salt
Up to 8 cups bread flour (or all purpose is ok too)
Directions:
1. In a large mixing bowl, combine yeast, water, milk and sugar. Stir to dissolve and let sit for about 5 minutes (The mixture should start to bubble or foam a bit and smell yeasty).
2. Add in oil, salt and 4 cups of flour. Using a wooden spoon, mix until the dough comes together.
3. Add remaining flour a quarter cup at time until the dough pulls away from the sides of the bowl and the dry flour is picked up from the bottom and sides. If it puddles and sticks all over the sides once the flour is picked up, continue adding flour in increments. At this point, I had added only 2 cups of flour after the original 4.
4. Turn out onto a generously floured surface and knead for several minutes. As you knead, sprinkle flour over the dough and knead it into the dough. Add flour to the counter as the sticky dough picks it up. As soon as the dough isn't sticking to the counter or your hands and it's smooth and springy, stop kneading. I used an additional 1 cup of flour for this step.
5. Place in a lightly greased bowl and cover with plastic wrap. Let rise for 1 hour, or until doubled in size.
6. Once the dough has risen, turn it out onto a lightly floured surface and divide it into desired portions. Shape each into a ball or loaf and place on a parchment-lined baking sheet (try not to handle the dough too much at this point). You won't be needing a bread pan. See below for tips on shaping round loaves and rolls.
7. Cover with a clean towel and let rise while you prepare the topping.
8. Coat the top of each roll or loaf with the topping as described below.
9. Once you’ve applied the topping, bake in a preheated 375ºF oven for 25-30 minutes, until well browned. Rotate pans half way through if you need to bake them on the top and bottom racks. Increase browning by baking closer to the top of the oven. Let cool on a wire rack before eating.
Dutch Crunch (Tiger Bread) Topping for 2 large loaves or 12 rolls (you won't use it all)
Can be used on any kneaded yeast bread dough.
2 tablespoons active dry yeast
1 cup warm water
2 tablespoons sugar
2 tablespoons oil
½ teaspoon salt
1½ cups rice flour (white or brown; NOT sweet or glutinous rice flour-increase by 1 cup or more for homemade rice flour)
Several drop of very toasty sesame oil (optional)
1/2 to 1 teaspoon Marmite (optional)
Directions:
1. Combine all ingredients in a large bowl and beat with a whisk; beat hard to combine. The consistency should be like stiff royal icing – spreadable, but not too runny. Mine was the consistency of a thin honey. Add more water or rice flour as necessary. Let stand 15 minutes.
2. Coat the top of each loaf or roll with a thick layer of topping. Spoon the topping onto the top of the dough and guide it around as it drips over the sides. You should err on the side of applying too much topping – a thin layer will not crack properly. Do not let too much topping pool up at the bottom of your dough, as it will create a hard dark foot and too much crunch on the bottom of your bread.
3. Place the rolls directly into the oven after applying the topping.
4. When baking, place pans on a rack in the center of the oven and bake your bread as you ordinarily would. The Dutch Crunch topping should crack and turn a nice golden-brown color.
Notes:
For my sandwich rolls, I used topping without the added sesame oil and Marmite first, then applied a cross shaped glaze of the darker topping. My large round loaf is glazed entirely with the darker topping. You can see this in my 3rd photo.
To create a nice round loaf or sandwich roll: With your dough on a lightly floured counter, cup your hands on the sides of the dough. Gently pull the dough underneath itself while rotating the dough clockwise. You will see the top of the loaf stretch smooth and it will create a nice rounded shape as you stretch and rotate. You don't want to tear the top and you don't want the folds to show on the sides. Keep any little folds under the loaf or roll, and stop pulling when the loaf has the height that you want and is round, smooth and tight.
Good luck with your own Dutch Crunch experience! It's a beautiful bread that I hope you try and love!
 Enjoy!
Wonderful job! Your Dutch Crunch is truly perfect! The addition of the sesame oil was a good choice! :)
ReplyDeleteGreat job-clever idea to flavor the topping!
ReplyDeleteFantastic job with the challenge! I love a good BLAT, too -- yum!
ReplyDeleteAw you have a whole streak of 'tigers' here, mama tiger with all the tiny cubs.. :) The buns are simply stunning!
ReplyDeleteI made these today, they turned out great :D
ReplyDeleteLooks great. Thank you, always woundering how to make this unique looking bread. it is very popular in UK! Will make it this tuesday:)
ReplyDelete@ Namratha: I live in Holland and that's what we call it, "Tiger bread".
ReplyDelete@ the Author: They look just like the real thing, only the 'flakes' are smaller on our Tiger-bread, but otherwise it's identical!
I will definitely give this one a shot if it tastes as good as it as it looks. But I've heard tales of another bread, from the Spokane region that would be an excellent bread for storage. I heard it was called "shepherds bread" and when baked formed a hard crusty shell. To store it you could just place it on a shelf, in no bag, but just let Have you heard of this bread or is it just a myth?
ReplyDeleteWell, I have never heard the term "shepherds bread" but I do know that if you have a really nice crust on your bread, you can store it cut side down on a cutting board instead of wrapped. I've only made one loaf of the sort and it was a round loaf baked in parchment paper in my dutch oven (a recipe from Cooks Illustrated). I did one quick internet search and there are some real shepherds bread enthusiasts out there! I will have to see what they say and give it go!
DeleteYour sandwich looks very yummy. I am not a baker but this bread looks so good. I might have to try it! :)
ReplyDeleteGorgeous Bread~ Dropping by from Food on Friday Carole's Chatter. I am defiantly going to make this bread, you have some great recipes!! Lynn @ Turnips 2 Tangerines Now following on GFC
ReplyDeleteI just "tested" my first two loaves. I followed the recipe as written and they look and taste great. One loaf is going to my friend, who is originally from Holland, and has not tasted one of her favorite breads for over a decade.
ReplyDeleteAnd now I am going back into the kitchen to test another slice!
Your bread looks amazing and I had often wondered how the crackled crust happened. Here in Australia it's called a tiger loaf, I'd say it's the same thing. I am going to have a go because I loved the tiger loaf so much. Thankyou for sharing...��
ReplyDelete